This is a VERY involved install that will require exhaust configurations, trips to the tool store, modifications, Jeep friends, and beer. This is NOT a quick “bolt-up” installation as I thought it would be. Understand that – you may require multiple days to get it done right.
This was one of the most significant installs I have done on my Jeep.
PART 1: Installing the Artec HD Crossmember
This part of the install covers the installation of the Artec HD crossmember which is highly recommended.


Step 1: Apply a good quality paint to the Artec HD crossmember.
Step 2: Remove factory transfer case skid plate. My Jeep is a 4 door manual.


Step 3: Place a floor jack under the transfer case to support the weight. You do not need to raise the drivetrain.

Step 4: Remove all 4 bolts from the ends of the crossmember (2 on each side). Remove all nuts from the transmission mount (on bottom of crossmember).

Step 5: Remove the factory crossmember.

Step 6: Consult the Artec documentation and cut the factory gas tank skid on the recommended line.

Step 7: Take the crossmember adapter from the Artec kit and place it over the new crossmember. This plate will sandwich between the HD crossmember and the transmission mount.
I did not have the part when I installed my crossmember and had to modify the plate. So if you can, be sure to install this plate now.
 The plate between the HD crossmember and the transmission mount.
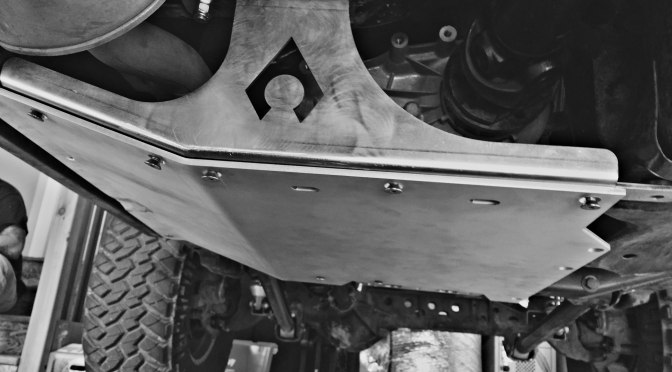
Step 8: Place new transfer case skid in place.

Step 9: Replace all bolts and nuts, tighten appropriately.
PART 2: Exhaust Check
If, like me, you had to install spacers to push your exhaust back when installing a smaller lift, you will need to remove them. You may also want to remove the OEM “loop” pipe on the driver’s side.
I had my exhaust system modified by a professional exhaust shop to accommodate these skids.

STEP 3: Installing the Skids
NOTE: The kit includes nutserts that go into the frame on the driver’s side. I decided to forego the nutserts and instead, tap the frame. For this, go get a 5/16th good drill bit, a T-handle tap wrench (for 1/4″-1/2″) and a 3/8″ tap.

Step 1: Layout all the parts and pieces (if you did not already do this when getting the support plate in step 7 above).

Step 2: Install the two small brackets in the front of the vehicle, to the motor mounts. The driver’s side mounts to the rearmost hole and the passenger side mounts to the foremost hole. Consult the instructions for clarity.


Step 3: Install the rear bracket to the upper crossmember below the tub. Using the existing factory hole, thread a nut and bolt in, and tighten (not over tight, you will be removing this).
Thread the factory bolt from the transfer case skit into the hole on the other end of the rear bracket into the gas tank skid.

Step 4: Mark the one area to be drilled (see above). Remove the bracket and drill the hole. Reinstall the bracket. You do not need to install the gas tank bolt.
Step 5: If you did not install the crossmember bracket/plate with an HD crossmember install, you will need to do it now. Follow steps 3-4 in section 1 of this install.
You will need to raise the jack to seperate the transmission skid plate from the crossmember enough to slide the plate between the two. Artec suggests pressing out the threaded studs in the plate to make it slide easier.

However, for us no amount of jacking got us the clearance we needed. We needed only an extra 1/2″ but could not make it happen.

No matter how hard we tried, we elected to modify the plate so it would slide around those studs.


We were then able to slide the plate in, and tighten all bolts.

Step 6: Hold up the transfer skid and ensure holes line up correctly.
The instructions call for a frame side bolt to be installed. We had to make the skid plate hole bigger to accommodate the bolt.

Also, we noted that where the frame seam lined up was off from where Artec expected it to be. This gap prohibited the skid from seating fully to the frame.
We had to use a grinder to remove material from the skid plate to better fit the frame seam.


Step 7: The frame clip that is needed for this plate was also off by about 1/2″ so we inserted the factory bolt and enlisted the help of the BFH to move it for us.


Step 8: Perform a test fitment by installing all available bolts. I found it to be easier by only putting a couple of threads on each, then tightening with an allen.

Step 9: Identify the frame side holes that require drilling. Drill and tap those holes. The forward hole will have many layers of frame steel and will thread well. The rear ward hole will not have much thread, but enough to lend support to the skid.


Step 10: Insert and tighten all remaining bolts.
Step 11: Hold up the gas tank skid. You may want to add a bolt or two forward of the skid (into the crossmember to help hold it in place).
Identify, based on your suspension if any modifications will be needed.
I am running an Evo bolt-in long arm kit and I had to make significant modifications to the gas tank skid.


Step 12: Install the bracket that will mate the gas tank skid with the transfer case skid.

Step 13: Install the rear gas tank skid brackets.

The gas tank skid adapter did not line up well with the factory holes. We enlisted the help of the BFH and loosened many bolts to provide some give. It finally worked after enlarging the bolt holes in these gas tank skid brackets.

Step 14: Tighten all bolts.
Step 15 (no photos): Bolt in the engine/oil pan skid at the front of the Jeep. Tighten all bolts. There are no clear guidelines about what bolts go where. The longer hex bolts do not fit in the rear of the engine/oil pan skid (through the bracket plate). I do have many empty holes in the skids.

That is the conclusion of the Artec Aluminum skid install. You may have different results based on the condition of your existing gas tank skid, suspension, and other factors.
Be sure, after the first 200 miles to check all bolts.
Install Thoughts: I know it is hard for manufacturers to accommodate everyone’s unique builds. But I was very surprised at the amount of fighting, modification, and brute strength this kit install took. Be prepared to call Artec and search the web for help. I hope this write up offers some assistance!

Thanks for the write up and feedback Scott. Your situation was truly a worse case install…exhaust spacers, EVO brackets, and manual tranny. That’s the most difficult thing about product design that spans multiple systems in a Jeep (engine, exhaust, transmission, t-case, drivelines, gas tank, suspensions, axles, etc.)…dealing with not only OEM options but hundreds of different aftermarket manufacturers and their modifications. Even within the OEM frame, it’s clear there is a wide range of acceptable tolerances from the factory as we’ve installed many of these and sold a ton without a report of having to clearance the skid for the frame transition. I generally offer a wide enough tolerance to compensate for things like this but unfortunately there is a fine line between trying to compensate for something we can’t possibly know the extent of and just plain leaving a huge gap. We do have a bolt strip that we can send you that takes the place of those nuts you had to cut out and will fill all the remaining holes where you have no bolts. Give us a call and we can send you that. The manual transmission is tough simply because the automatic doesn’t require any modification because it doesn’t use those same bolt holes. We are working to make it more universal and we will use your write up to help us in that process so thank you. As a final note, as I said at the beginning, yours was definitely a worst case situation, because, in contrast, we’ve had installs that only took 2-3 hours. Those reports were very positive and they were amazed at how well everything fit together. As you’ve encountered, certain aftermarket changes complicate things. Again, thank you for your write up. It definitely helps to hear details about how things go together. -Nate at Artec
LikeLiked by 1 person
On a separate side note, if your Jeep is really abused and bashed underneath, this can also complicate install because it is no longer within OEM spec. In discussing your install with our tech department who helped you, it seems this may be the case where your crossmember frame brackets may be tweaked due the challenge of installing your new crossmember which is to exact OEM specs. Since the whole bellypan is based off the crossmember, if it is off, everything else will be off. It is highly recommended that anyone replace the factory crossmember as one of the first upgrades to a JK. -Nate at Artec
LikeLiked by 1 person
Thanks for responding on here, Nate. And you are correct, my rig is custom and had some undercarriage bumps from all the trails 🙂 I will say your instructions could use some field testing from actual weekend wrench monkeys like me.
LikeLike
Nate(Artec), I’m about to begin the same install on a 2017 Rubicon RECON with Manual transmission. The most glaring problem with the instructions is they do not explain where the Nut strip is being installed or mod’s required to part #6, (I presume nutstrip installs through the side square hole in the Artec Cross Member) & questioned what mods/nutserts are being removed in part #6. It wasn’t until I seen Scott’s pics of the slots cut into part #6 that I understood what the install is requiring. Scott’s write up confirms what I presumed, Artec’s instructions in regards to the Nut strip install & mod’s to part #6 for manual transmission Jeeps in very Vague!
Artec, a simple drawing of mods required to part#6 & position on nutstrip install would be very helpful & possibly improve your sales!
Scott, Nice work on your Instructional Column!
LikeLike